| Publish Date | 2018/07/05 |
|---|
Introduction
About this Series
This series provides information about the set-up procedures and the basic how-to of Hinemos. This series is intended for new users who are not familiar with its capabilities.
By following the tutorial of this series, it will provide you with the first steps for mastering Hinemos.
“Introduction (1) Getting Started with Hinemos” explains the set-up procedures and the fundamental operation instructions of Hinemos.
First, let’s start off by creating an environment where we can run Hinemos.
Prerequisite
This tutorial assumes that you have a PC running Windows 10 and a working environment for VMware Player.
Notices
The version number of Hinemos (6.1.*) which appear in this tutorial shall be replaced as necessary with the version you are using.
Disclaimer
We will not be responsible for any loss or damage that may result from the use of this tutorial or any software introduced in this tutorial.
Environment Setup
Installing required packages
Before setting up Hinemos, download VMware Player and CentOS, and install CentOS as two guest OSs on the VMware player.
1. Download the VMware Player
Download the VMware Player for Windows from the site below.
Download VMware Player (external link)
2. Download CentOS
You can download CentOS from the site below.
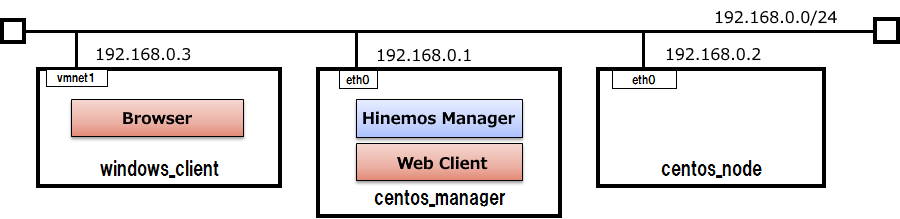
System Overview
Hinemos consists of the manager, client and managed targets.
Hinemos Manager
・ Server which provides operation management feature of Hinemos.
・ Installs Hinemos Manager to.
・ Setup as guest OS1 of VMware Player on Windows 10.
Managed node
・ Machines to be managed by Hinemos.
・ In order to use the job feature and some of the monitor features, it is necessary to install the Hinemos Agent. However, we will not be using Hinemos Agent during Introduction(1).
・ Setup as guest OS2 of VMware Player on Windows 10.
Hinemos Client
・ Devices controlled by the operator.
・ 2 types of clients are available. The Rich client, which is the GUI application, and the Web Client, which is accessible through a browser.
・ Install the Web Client to the guest OS1 of VMware Player on Windows 10.
・ The browser for accessing Hinemos Client is Internet Explorer 11.

In this tutorial, to understand its features, we will configure the following environment and practice monitoring and executing jobs using Hinemos.
We will use the following values (especially the hostname and IP address) for the environment information. Replace the values as necessary with the setting of your environment.
- Windows 10 (Host OS, browser used in your environment)
- CentOS7.1 (Guest OS1, Hinemos Manager, the environment used as the Web client)
- CentOS7.1 (Guest OS2, the environment used as the managed node)
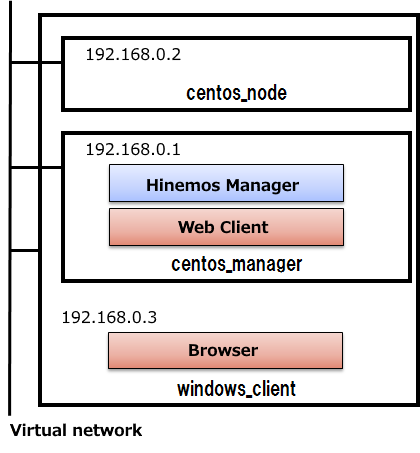
Machine configuration(Physical configuration)
Machine configuration(Logical configuration)
Using Hinemos
The procedures for starting up Hinemos for the first time will be explained in the following order.
・ Setting up Hinemos
Explain how to download, install, and start Hinemos.
・ Registering the managed nodes to Hinemos
Explain how to login to Hinemos, and to register the managed nodes.
・ Viewing the state of the managed nodes
Explain how to configure monitoring setting on Hinemos, and to check the state of the managed nodes.
Setting up Hinemos
Explain how to download, install, and start Hinemos.
1. Downloading the Hinemos packages
Since Hinemos is an OSS integrated operation management tool, anyone can download for free from the GitHub Hinemos project (external link). First, let's download the Hinemos Manager package and the Hinemos Client package we are going to use during this set-up from the following website.
[Manager/Agent/Client packages are available here]
2. Setting up the Hinemos Manager
Before installing Hinemos to centos_manager, check the following 3 points.
・Check that SELinux is disabled
Hinemos Manager cannot be installed if SELinux is enabled. You must disable SELinux in advance.
        [root]# cat /etc/selinux/config

        # This file controls the state of SELinux on the system.
        # SELINUX= can take one of these three values:
        #    enforcing - SELinux security policy is enforced.
        #    permissive - SELinux prints warnings instead of enforcing.
        #    disabled - No SELinux policy is loaded.
        SELINUX=enforcing
        …
If the parameter of "SELinux" is set to "enforcing" as noted above, "SELinux" enabled. If so, change the parameter from "enforcing" to "disabled" and restart the server.
・Check that firewalld is configured properly
When connecting to the Hinemos Manager, the port must be connectable from the Hinemos Client. Right after installing the OS, firewalld might be enabled and configured to reject the connection to the port used by Hinemos, so it is required to properly configure the permission setting of the Hinemos Manager’s listening port. When trying out Hinemos, you will be able to open Hinemos Manager’s listening port by simply stopping firewalld. Disable firewalld by using the command below.
[root]# systemctl stop firewalld
For details about the network requirements necessary when using Hinemos, refer to the document below.
- Hinemos ver.6.1 Installation manual 3.7 Network Requirements
When setting up Hinemos in an actual operating environment, use the information in the document above to configure the listening ports appropriately.
・Check that OpenJDK8 is installed
Hinemos Manager ver.6.1 runs on Java8, so it is required for Java8 to be installed in advance. Use the rpm command and check whether java-1.8.0-openjdk package is installed.
        [root]# rpm -qa | grep java-1.8.0-openjdk
        java-1.8.0-openjdk-1.8.0.161-0.b14.el7_4.x86_64
If you do not see the above, install the java-1.8.0-openjdk package included with CentOS. If you have an internet connection, you can install it by using the yum command below:
        [root]# yum install java-1.8.0-openjdk
        Loaded plugins: fastestmirror, refresh-packagekit, security
        Loading mirror speeds from cached hostfile
        …
        Installed:
        java-1.8.0-openjdk.x86_64 1:1.8.0.161-0.b14.el7_4


        Complete!
・Other required packages
The following packages are required to run Hinemos Manager ver.6.1.
・ vim-common
・ unzip
Like installing Java8, if you have an internet connection, you can install it by using the yum command. If the packages above are not installed, please install them.
・Check if the hostname is resolved
Hinemos Manager will fail to start if the hostname cannot be resolved.
You can simply ping centos_manager's hostname to see if it is working properly or not. First, find out the hostname by the following command.
        [root]# hostname
        centos_manager
Next, run ping command on centos_manager.
        [root]# ping centos_manager

        PING centos_manager(192.168.0.1) 56(64) bytes of data.
        64 bytes from centos_manager(192.168.0.1): icmp_seq=1 ttl=64 time=0.026 ms
        64 bytes from centos_manager(192.168.0.1): icmp_seq=2 ttl=64 time=0.046 ms
        ...
The result above shows that the host address is being resolved properly. Note that you have to press Ctrl-C to terminate the ping command.
If you cannot get the above result, you have to add the hostname to the DNS server or /etc/hosts at first and check again.
The following steps will show you how to add a hostname and IP address mapping to /etc/hosts. However, if you have to do with the DNS server, you should follow the DNS server instructions instead.
        [root]# echo 192.168.0.1 centos_manager >> /etc/hosts
        [root]# cat /etc/hosts
        ...
        192.168.0.1 centos_manager
This finishes the preparations.
Now, let’s install the Hinemos manager.
2-1. Place the downloaded "hinemos-6.1-manager-6.1.x-1.el7.x86_64.rpm" on centos_manager.
2-2. Login to centos_manager as the root user.
2-3. Install using the rpm command. If the install package is placed under /root directory, run the following command.
[root]# cd /root
Next, start the installed Hinemos manager. Use the service command and start the Hinemos manager.
        [root]# service hinemos_manager start
        Redirecting to /bin/systemctl start  hinemos_manager.service
        [root]#
Hinemos Manager startup is completed when the message above is displayed.
After Hinemos Manager started, run netstat command to check if 8080 port is listening.
        [root]# netstat -aon | grep 8080
        tcp6    0    0 192.168.0.1:8080    ::::*     LISTEN
If netstat command is not available, try ss command instead.
        [root]# ss -lnt | grep 8080
        LISTEN    0   50    ::ffff:192.168.0.1:8080      :::*
The above result shows that Hinemos Manager is started properly.
Please mark down the IP address and port (192.168.0.1:8080 in this case). You will need it when you login to Hinemos.
3. Setting up the Hinemos Web Client
Next, set-up Hinemos web on centos_manager.
3-1. Place the downloaded "hinemos-6.1-web-6.1.x-1.el7.x86_64.rpm" on centos_manager.
3-2. Login to centos_manager as the root user.
3-3. Install using the rpm command. If the install package is placed under /root directory, run the following command.
[root]# cd /root
Next, start the installed Hinemos Web Client. Use the service command and start the Hinemos Web Client.
        [root]# service hinemos_web start
        Starting hinemos_web (via systemctl):                  [  OK  ]
        [root]#
Hinemos Web Client startup is completed when the message above is displayed.
Registering managed nodes to Hinemos
We will explain how to login to Hinemos and register managed nodes.
1. Login to Hinemos
Launch the browser on windows_client and connect to Hinemos Manager.
1-1. Launch the browser and access to the server where the Hinemos Web Client is installed. In this case, the connection URL is "http://192.168.0.1".
↓ Click to enlarge↓
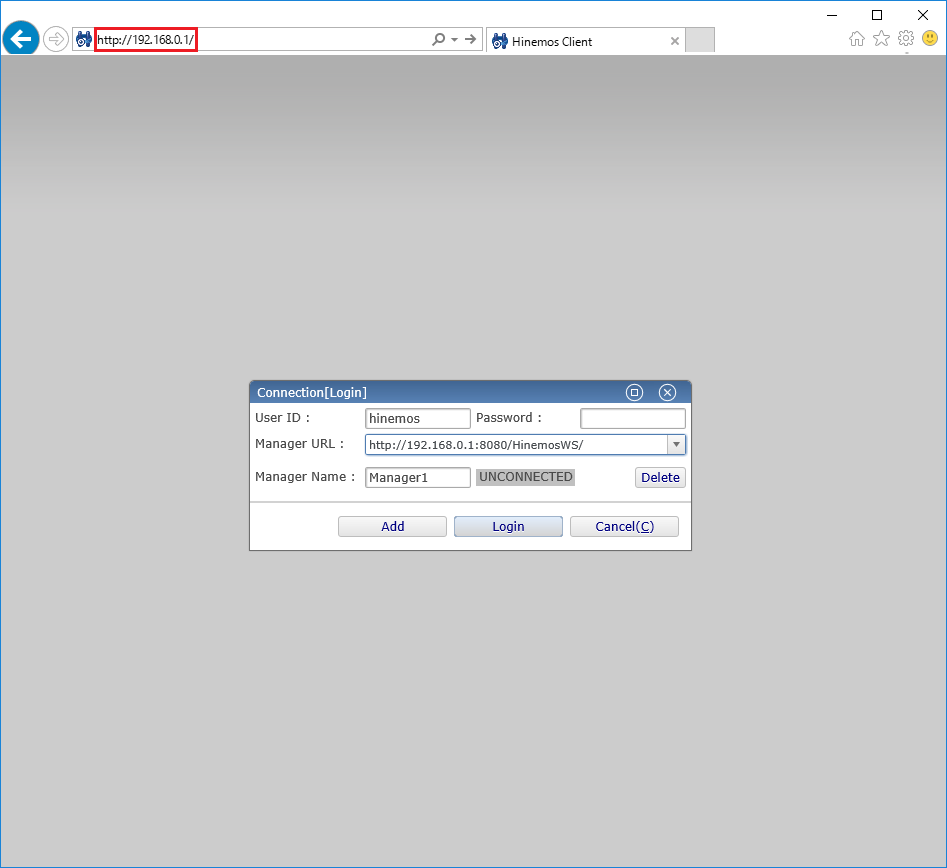
1-2. Login to Hinemos Manager. "Connect [login]"dialog will be displayed. Fill in the following entries.
↓Click to enlarge↓
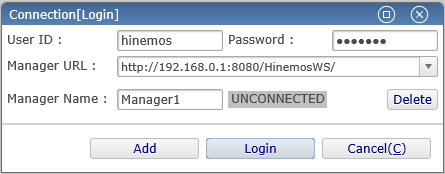
・ User ID
Enter the login user. Enter "hinemos" since only user "hinemos" is available right after the installation.
・ Password
Enter the password for the login user. The default password for the user "hinemos" is "hinemos", so enter "hinemos".
・ Connection URL
Enter the URL used to connect to the Hinemos Manager. Enter "http://(IP address of Hinemos Manager):8080/HinemosWS/" for the connection URL.
 Multi-Manager connection
- ◆You can login to multiple Hinemos Managers from one Hinemos Client and check the settings and monitoring results for each Hinemos Manager. When you press the "Add" button in the "Connection[Login]" dialog, the field to enter the user ID, password, and the connection URL will be added. Enter the information of the Hinemos Manager you want to login and press the "Login" button.
1-3. If the login setting is configured properly, the login success dialog will appear. When you press the "OK" button, the initial screen of Hinemos Client will be shown as below.
↓Click to enlarge↓
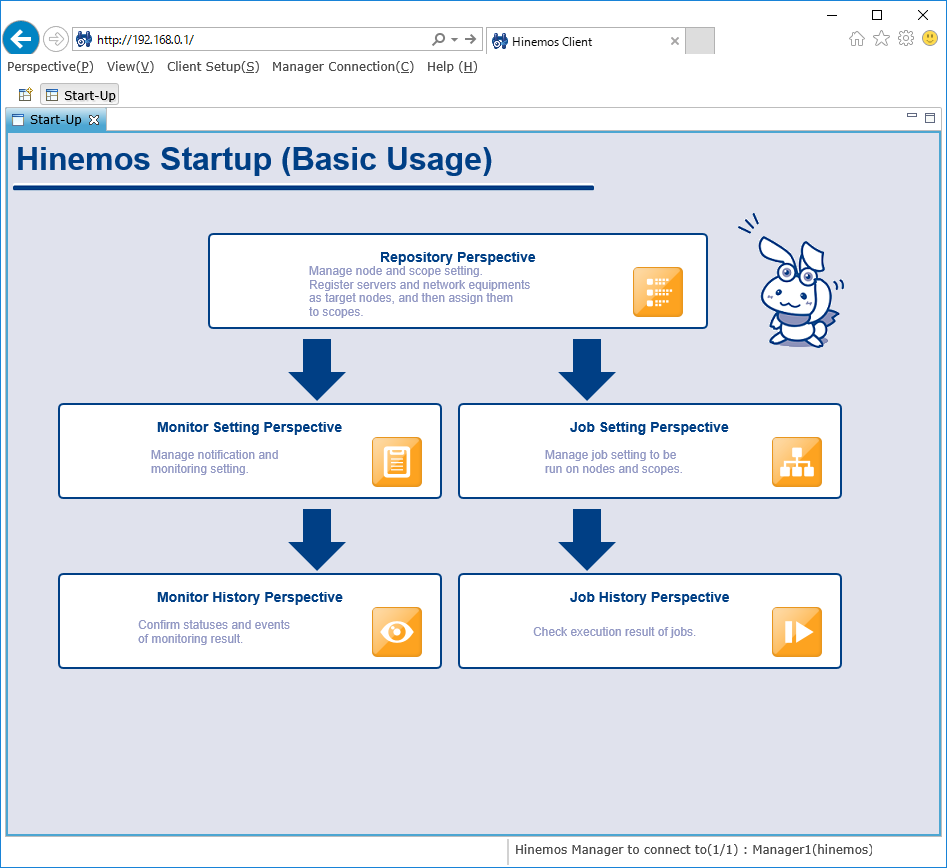
Login is complete when the Hinemos login user and connection URL are displayed on the bottom right screen as shown above.
2. Registering the managed nodes
The database for registering the managed nodes is called the "repository". You must first register the managed nodes to the "repository". Let’s register centos_node as a managed node.
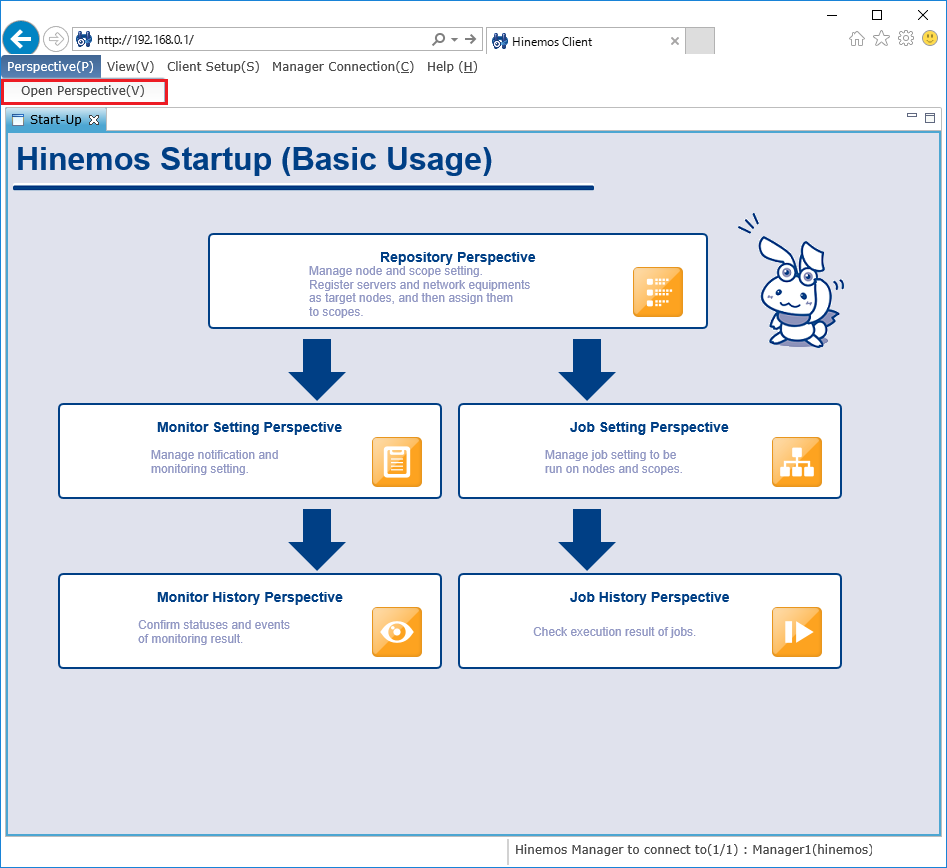
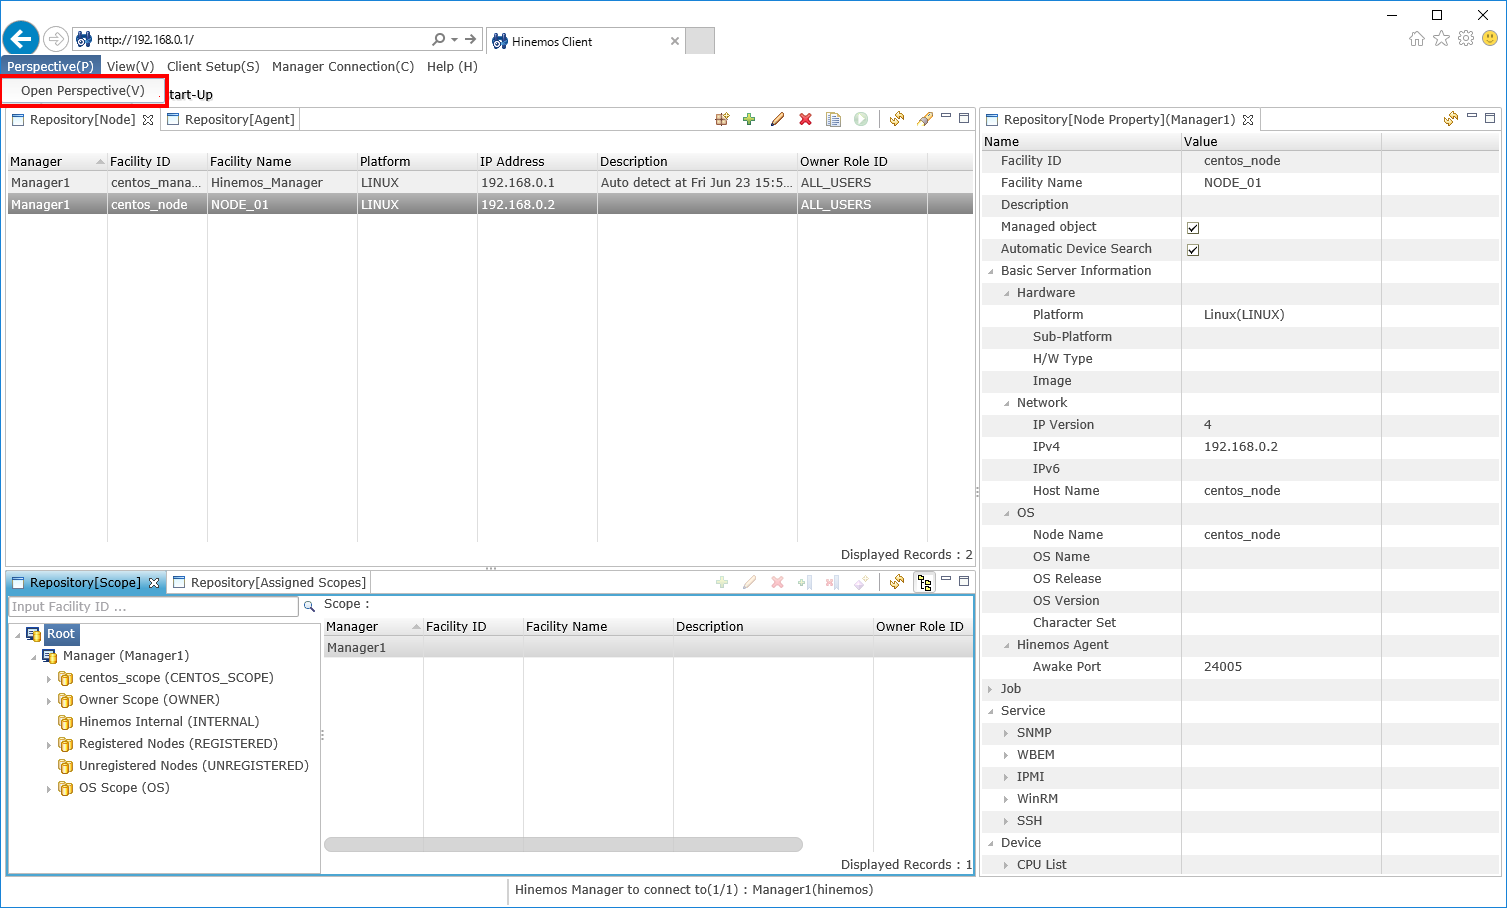
2-1. Display the "Repository" perspective from the menu bar.
↓Click to enlarge↓
2-2. Select "create" from the top right icon of the "Repository [Node]"view.
↓Click to enlarge↓

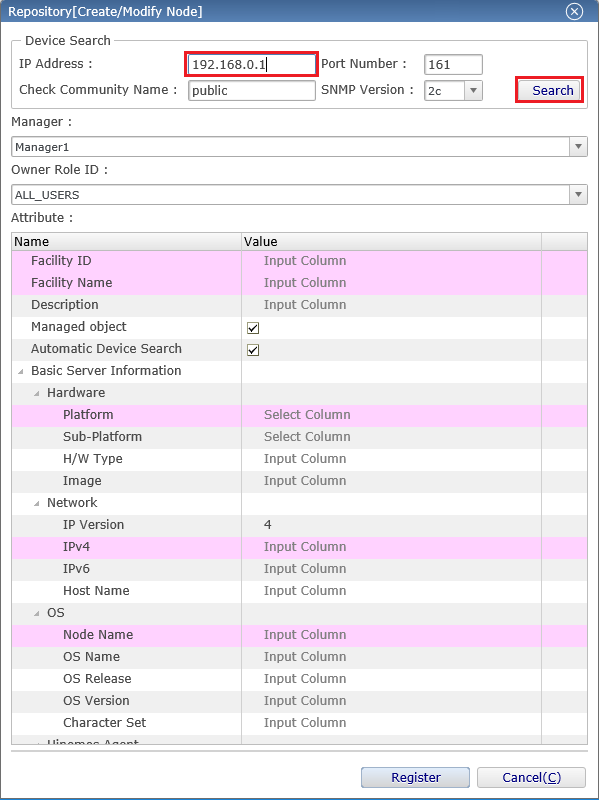
2-3. Enter the information of the managed nodes, and press the "register" button. Required entries of the configuration are shown with a pink background. Configure as shown below.
↓Click to enlarge↓
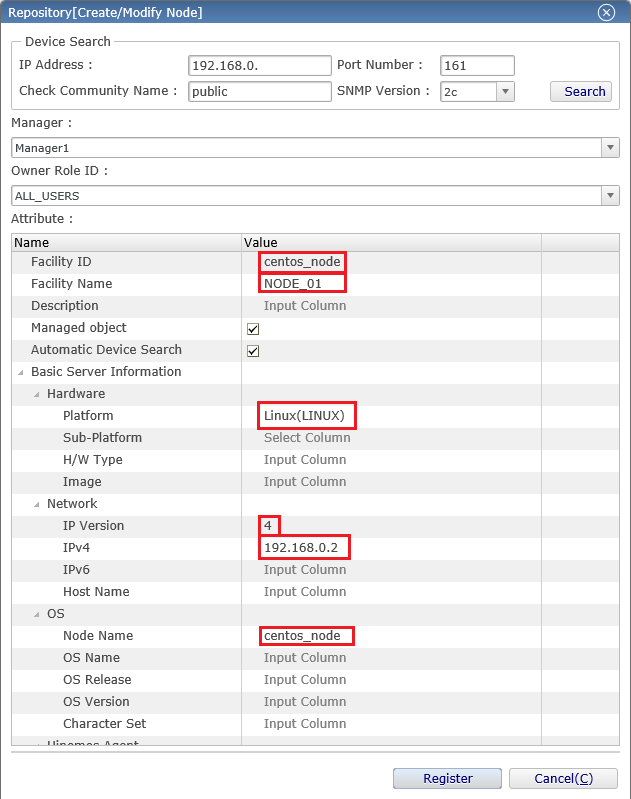
・ Facility ID
The string used to identify the individual managed nodes and scopes. When registering a node or scope, set the facility ID to be unique within the system. We'll explain about the scope later.
・ Facility name
Like the facility ID, it is the string given to the managed node and scope. Because it can be set arbitrarily, the operator can set any string for them to easily identify the managed nodes.
・ Platforms
Set the platform of the managed node from "Linux", "Windows", "Network Equipment" and "Other".
・ Version of the IP address
Specify the version of IP address used when communicating with the managed nodes. Choose either "4" or "6'. Also, the IP address of the selected version is a mandatory setting.
・ Node name
Enter the hostname of the managed nodes.
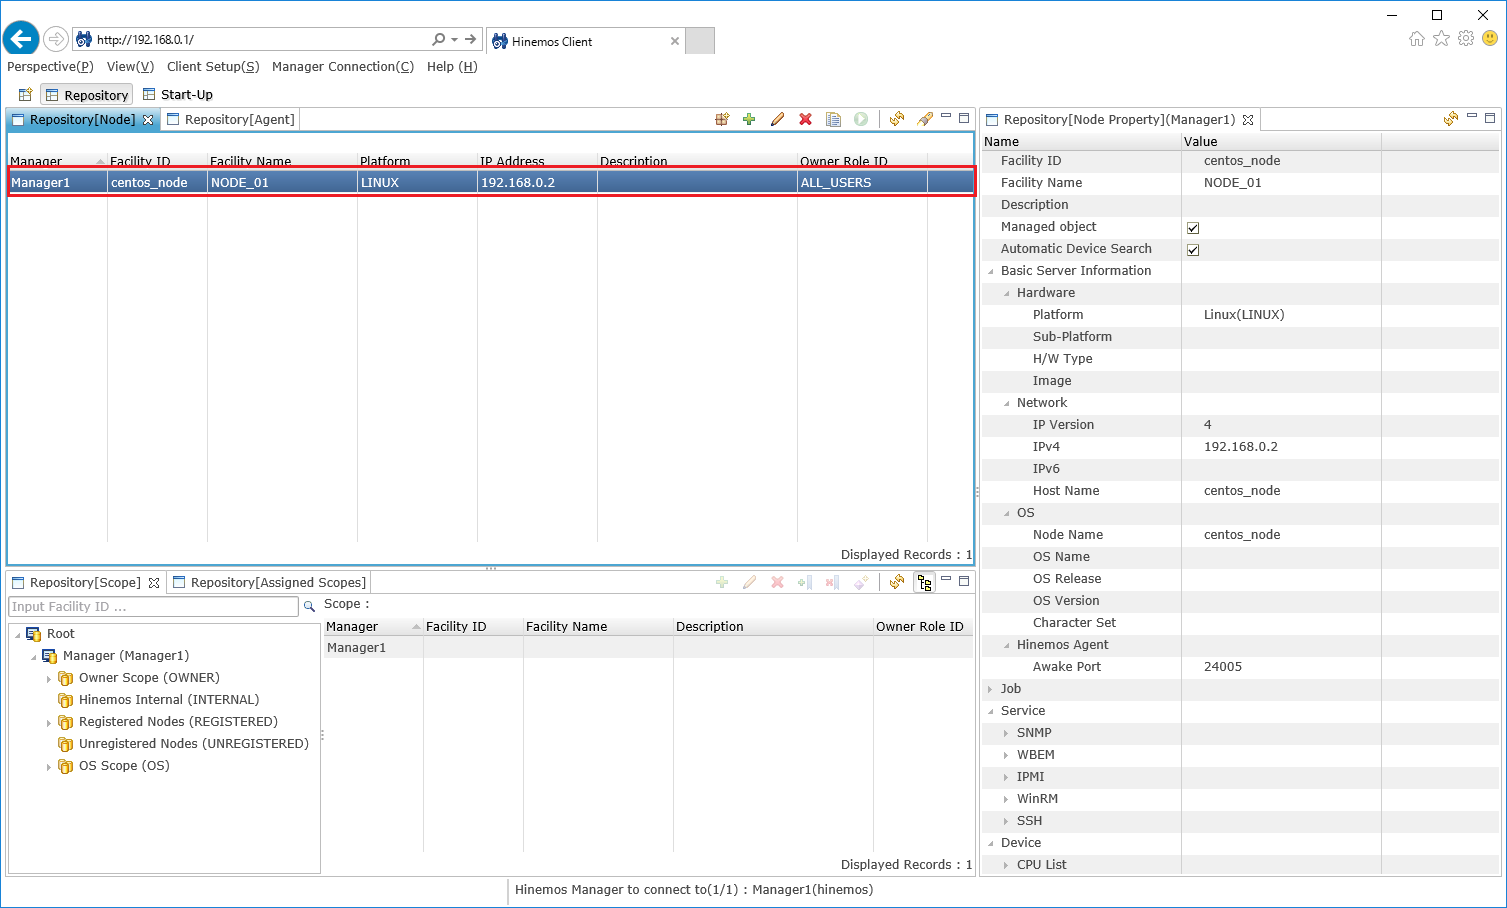
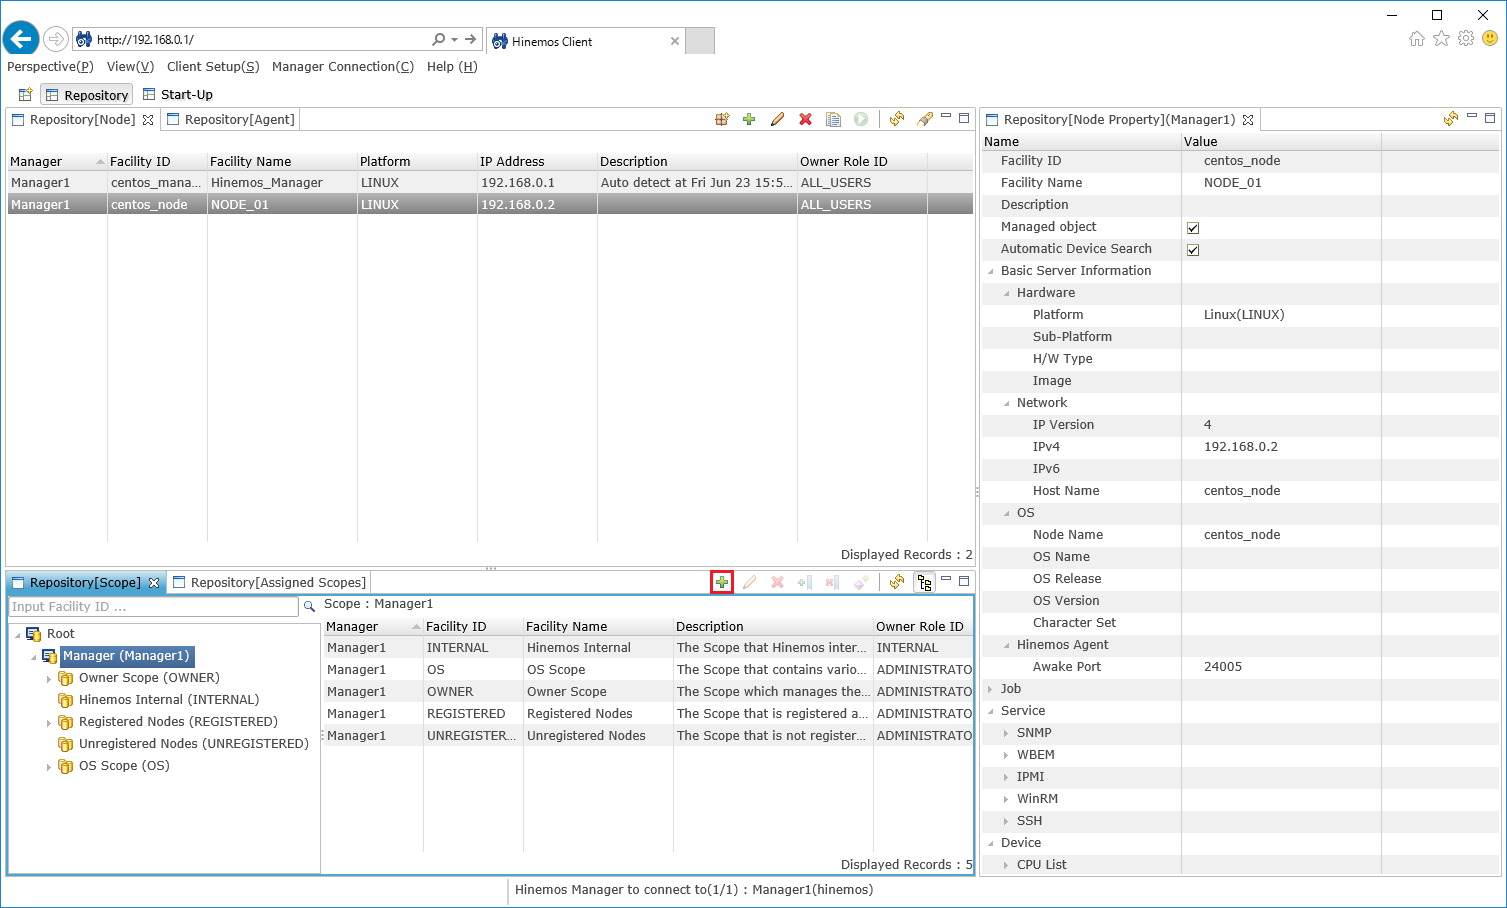
2-4. Check that the managed node is registered from the "Repository [Node]" view.
↓Click to enlarge↓
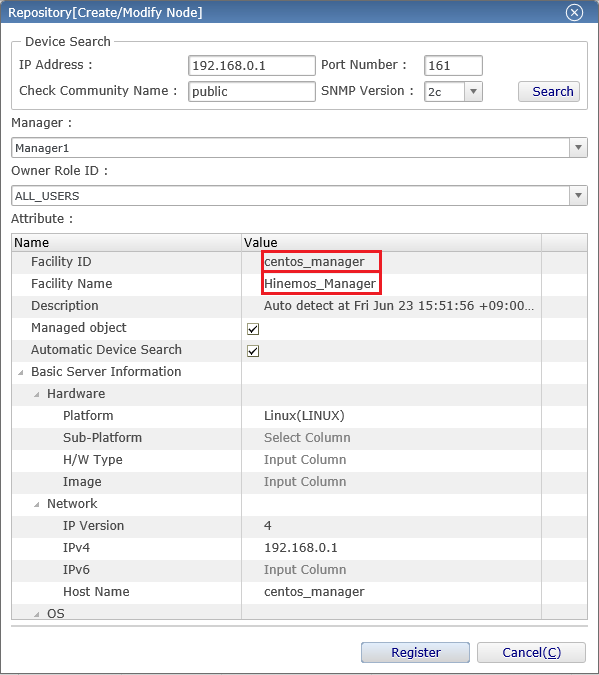
2-5. Next, use the "device search" to register centos_manager as a managed node. "Device search" retrieves partial information of the managed nodes through SNMP and sets them to the appropriate entries. Press "create" from the upper-right icon of the "Repository [Node]" view, enter the IP address of centos_manager in the IP address field of the "device search" as shown below, and press the "search" button.
↓Click to enlarge↓
2-6. Manually set the facility ID and facility name as shown below, and press the "register" button.
↓Click to enlarge↓
This finishes the registration of managed nodes.
Node search
◆By using the node search feature, you can search the range of the specified IP addresses and automatically register node information of nodes that have SNMP response. Open the "Repository [Search Nodes]" dialog by pressing the "Search Nodes" button in the "Repository [Node]" view.
↓Click to enlarge↓
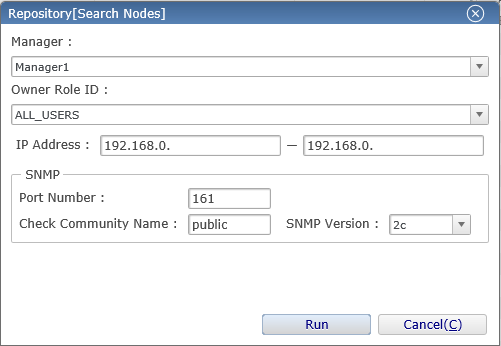
Enter the IP addresses of the range you want to search, press the "Run" button to run the node search and display the list of registered nodes. The name of the node is registered as the facility ID and facility name.
3. Creating a scope
Hinemos can perform various operations such as monitoring and running jobs on the managed nodes, but it may be difficult to configure each managed node one by one. Hinemos have a mechanism called a "scope" that allows you to freely group the managed nodes. You can set the target of the monitoring and job for each "scope". Let's create a "scope" and assign the managed nodes.
3-1. Select "Create" from the upper-right icon of the "Repository [Scope]" view.
↓Click to enlarge↓
3-2. Enter the information of the "scope" and press the "register" button. The content displayed in the pink background color are the required settings. Please set them as shown below.
↓Click to enlarge↓
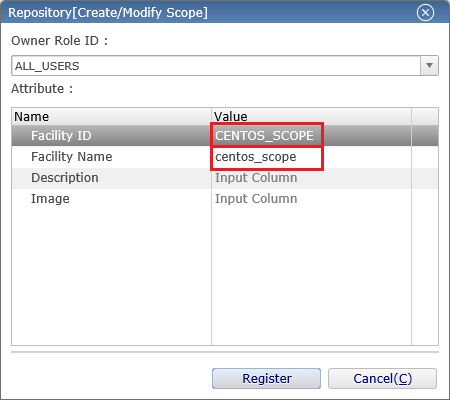
・ Facility ID
Like the facility ID of the managed nodes, it is the string used to identify the individual "scopes". Set the facility ID to be unique within the system. In addition, the facility ID is treated as a common information with the managed node, therefore you cannot use the same facility ID as the managed node.
・ Facility name
Like the facility name of the managed node, because it can be set arbitrarily, the operator can set any string for them to easily identify the managed nodes.
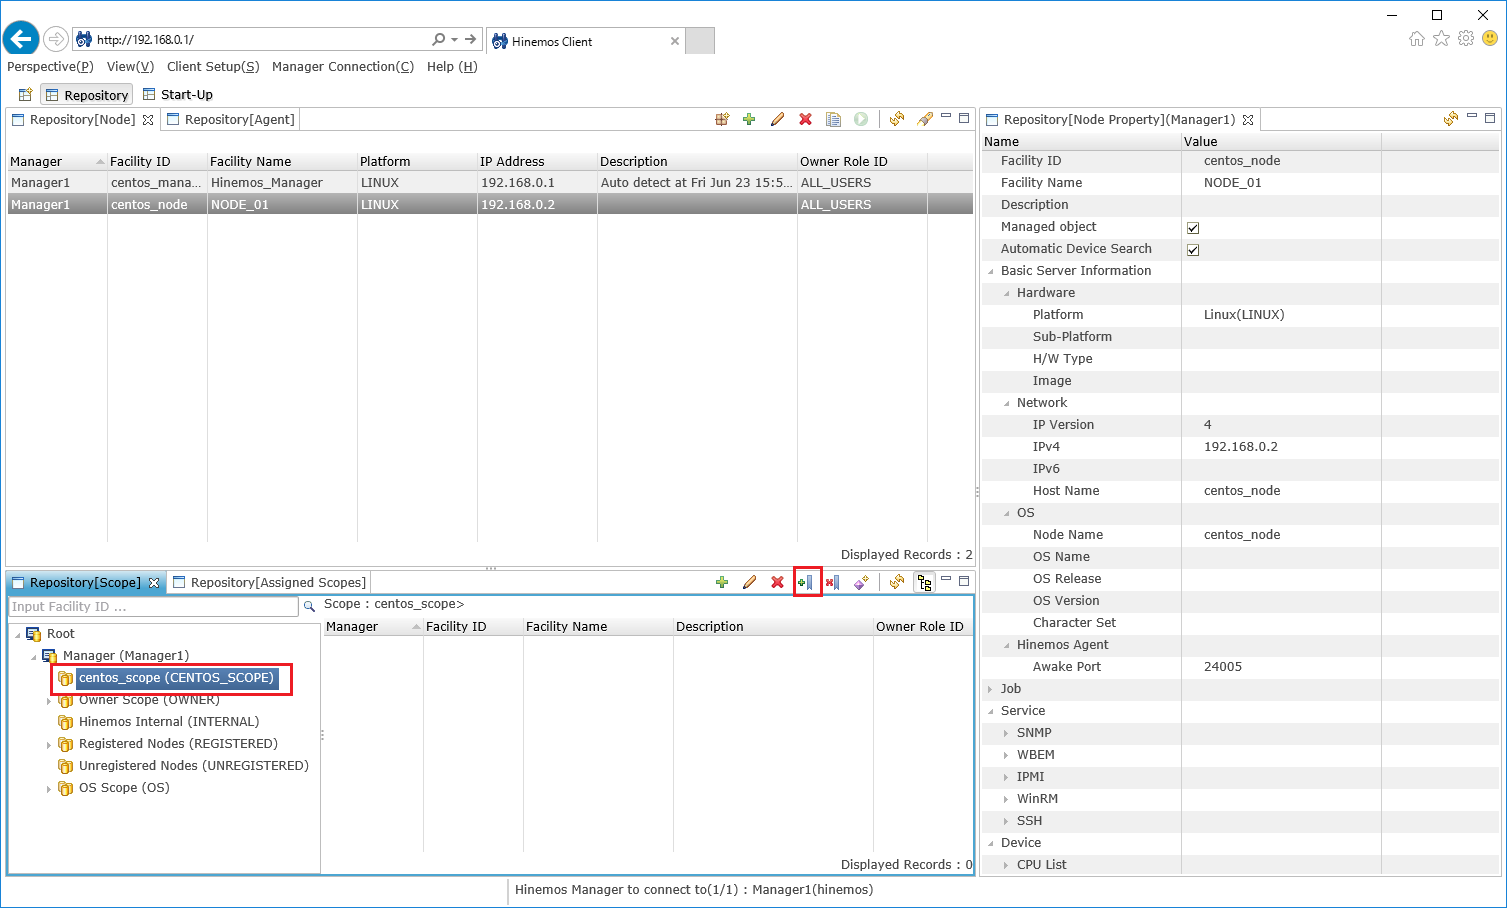
3-3. Assign the managed node to the "scope" created. While focusing the "scope" created in the "Repository [Scope]" view, choose "assign" from the upper-right icon.
↓Click to enlarge↓
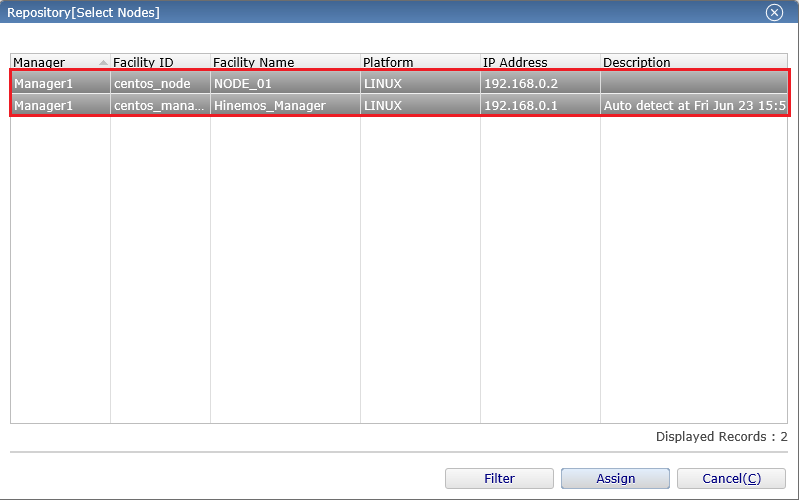
3-4. The list of the registered managed nodes is displayed, so select the managed node (s) you want to assign, and press the "assign" button.
↓Click to enlarge↓
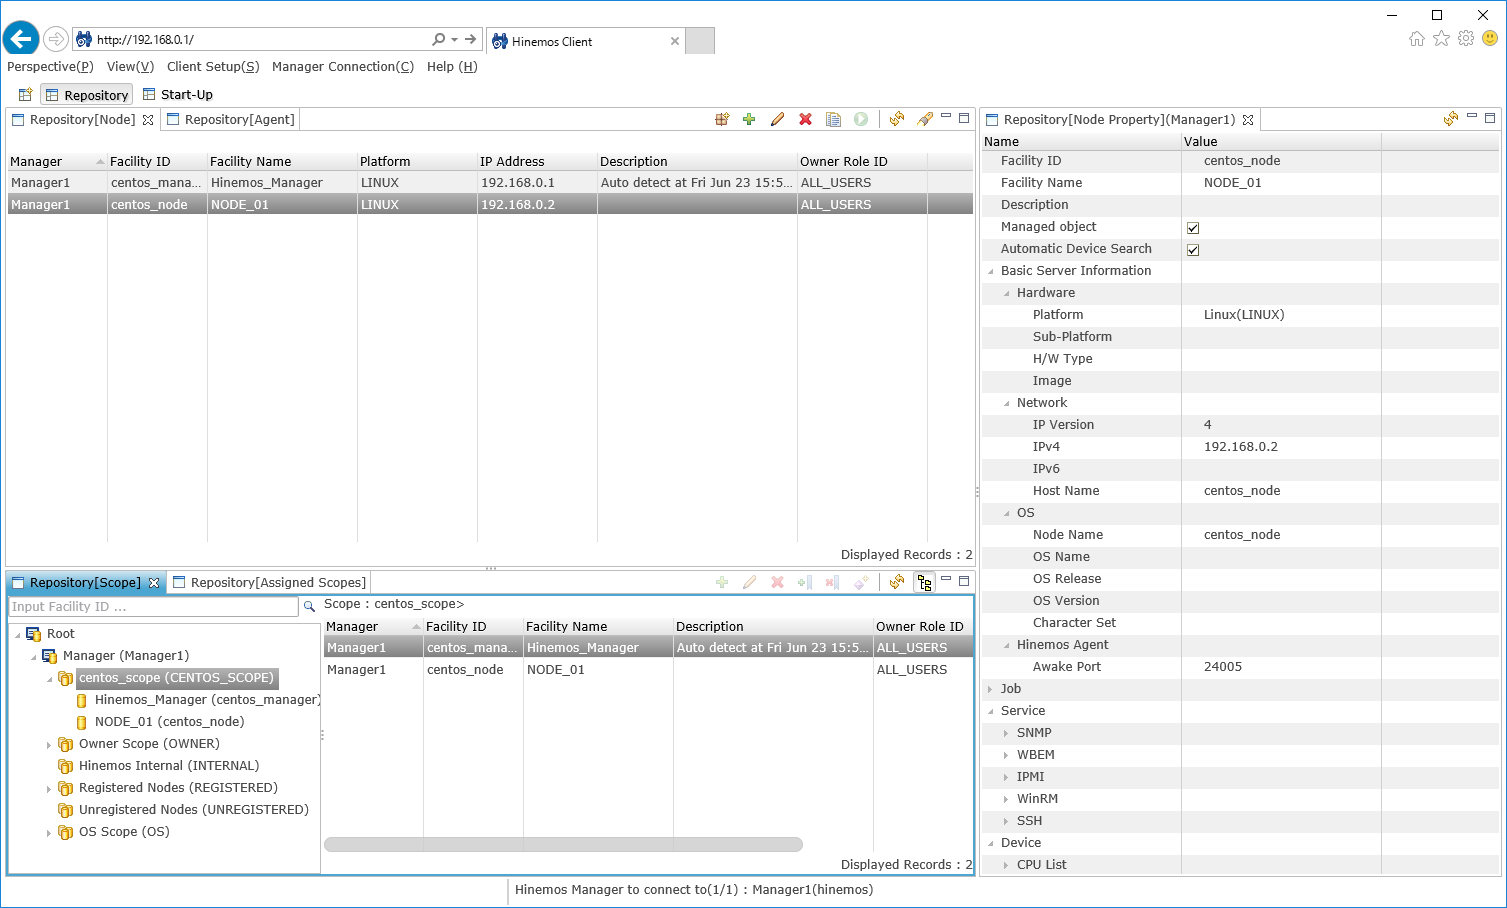
3-5. When the registration is complete, verify that the managed node is assigned to the target "scope" in the "Repository [Scope]" view.
↓Click to enlarge↓
This finishes the registration of managed nodes to Hinemos.
Monitoring the condition of the managed nodes form Hinemos
At the end of Introduction(1), I would like to finish by explaining how to configure a simple monitor setting and check the status of the managed nodes.
1. Configuring PING monitor
Hinemos have a variety of monitoring features, but here, we will configure the simplest monitor setting, the PING monitor.
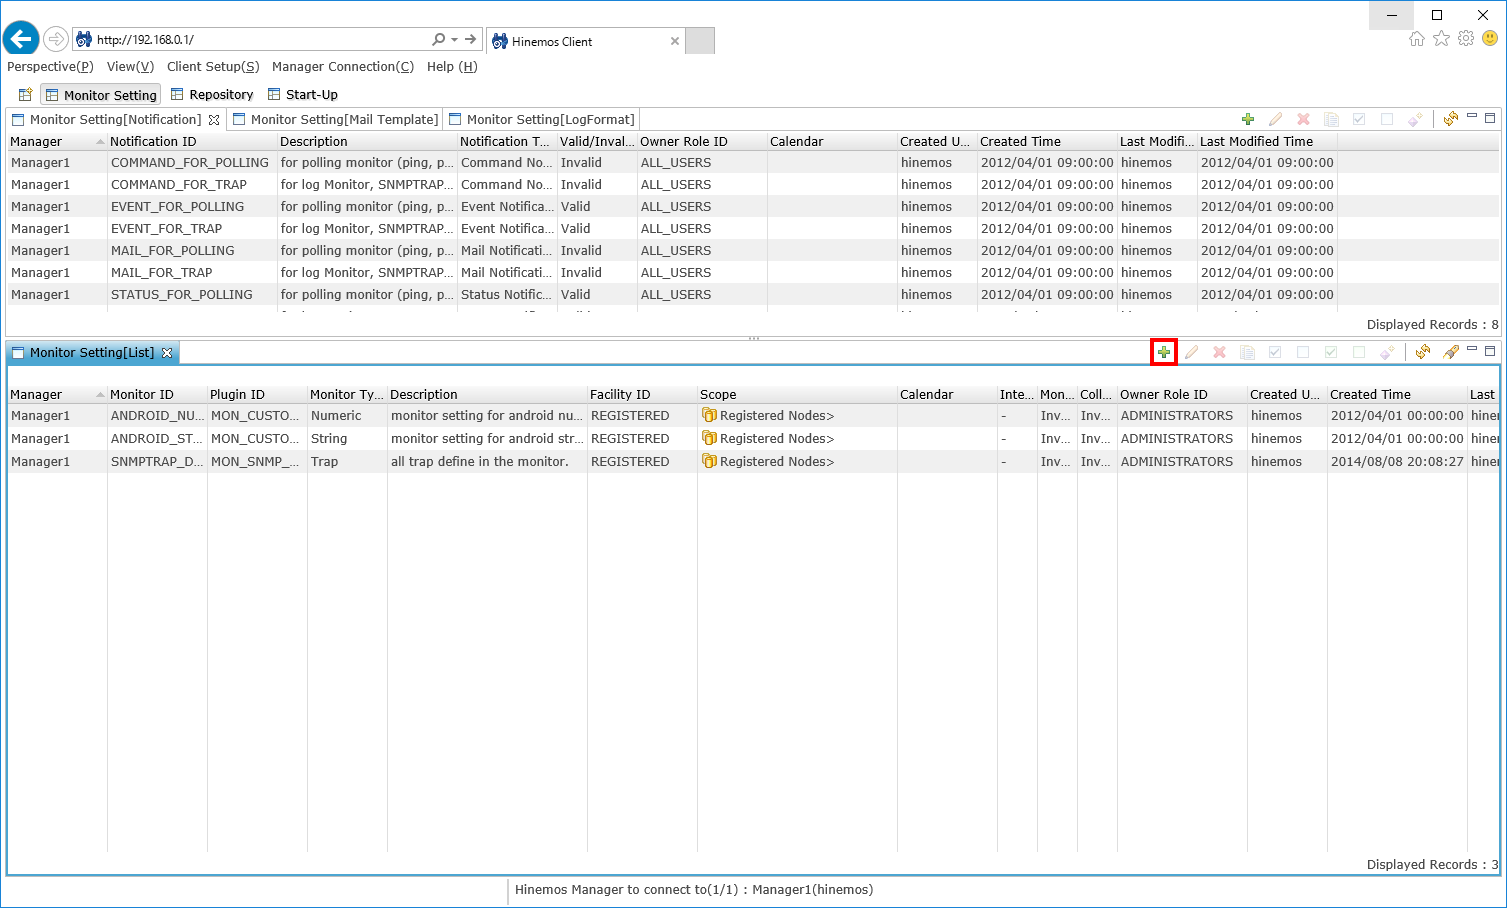
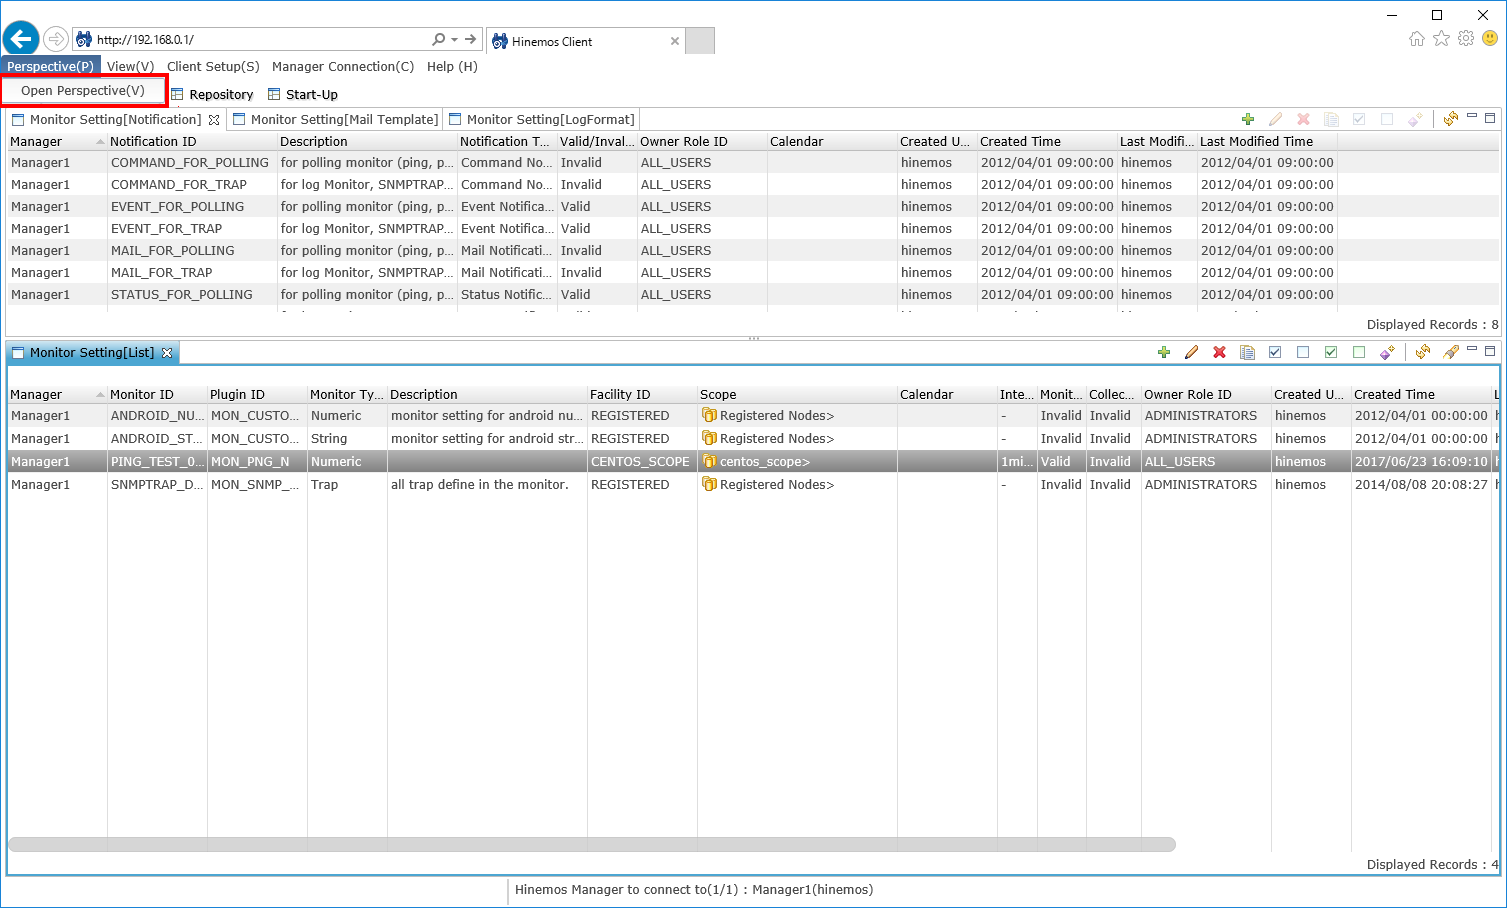
1-1. Open the "monitor setting" perspective from the menu bar.
↓Click to enlarge↓
1-2. Select the "Create" button from the "Monitor Setting[List]" view.
↓Click to enlarge↓
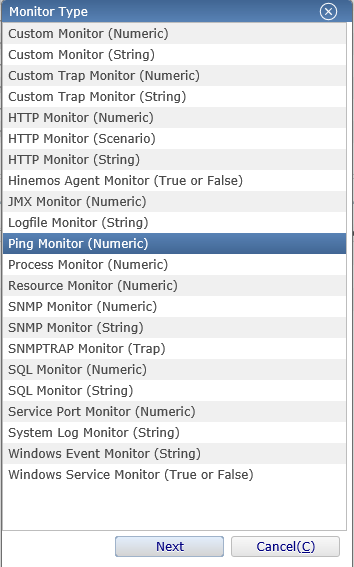
1-3. Select "PING monitor (Numeric)" from the "monitor type" dialog.
↓Click to enlarge↓
1-4. Enter the settings for the PING monitor and press the "OK" button. The content displayed in the pink background color are the required settings. Please set them as shown below.
↓Click to enlarge↓

・ Monitor ID
A string that is defined by the user when registering a monitor setting. It will be displayed in the monitoring results, so it is recommended that you set an ID which you can distinguish it from the other monitor IDs. Set it to be unique within the system.
・ Scope
Select the "scope" or the node of the monitoring node.
・ Conditions: interval
Specify the monitoring interval. Considering the load of the Hinemos Manager when setting a large number of monitoring settings, we usually recommend setting the interval to 5 minutes or longer. However, it is also possible to set it to 1 minute, to reduce the waiting time when performing operation check.
・ Application
You can set any string suitable for your operation. It will also be displayed in the monitoring results, so it is recommended that you set a string which can be distinguished by the operator.
The following are not mandatory but usually required for monitoring operations.
・ Notification ID
Specifies the notification ID of the notification setting to be used as the notification method. Press the "select" button to display the selection screen of the notification ID to be applied to the monitoring results. You can choose a variety of notification methods, such as displaying on the Hinemos Client and notification by mail. The details of the notification will be introduced in the introductory chapter in the future.
1-5. Check that the PING monitoring setting is displayed in the "Monitor Setting[List]" view.
↓Click to enlarge↓
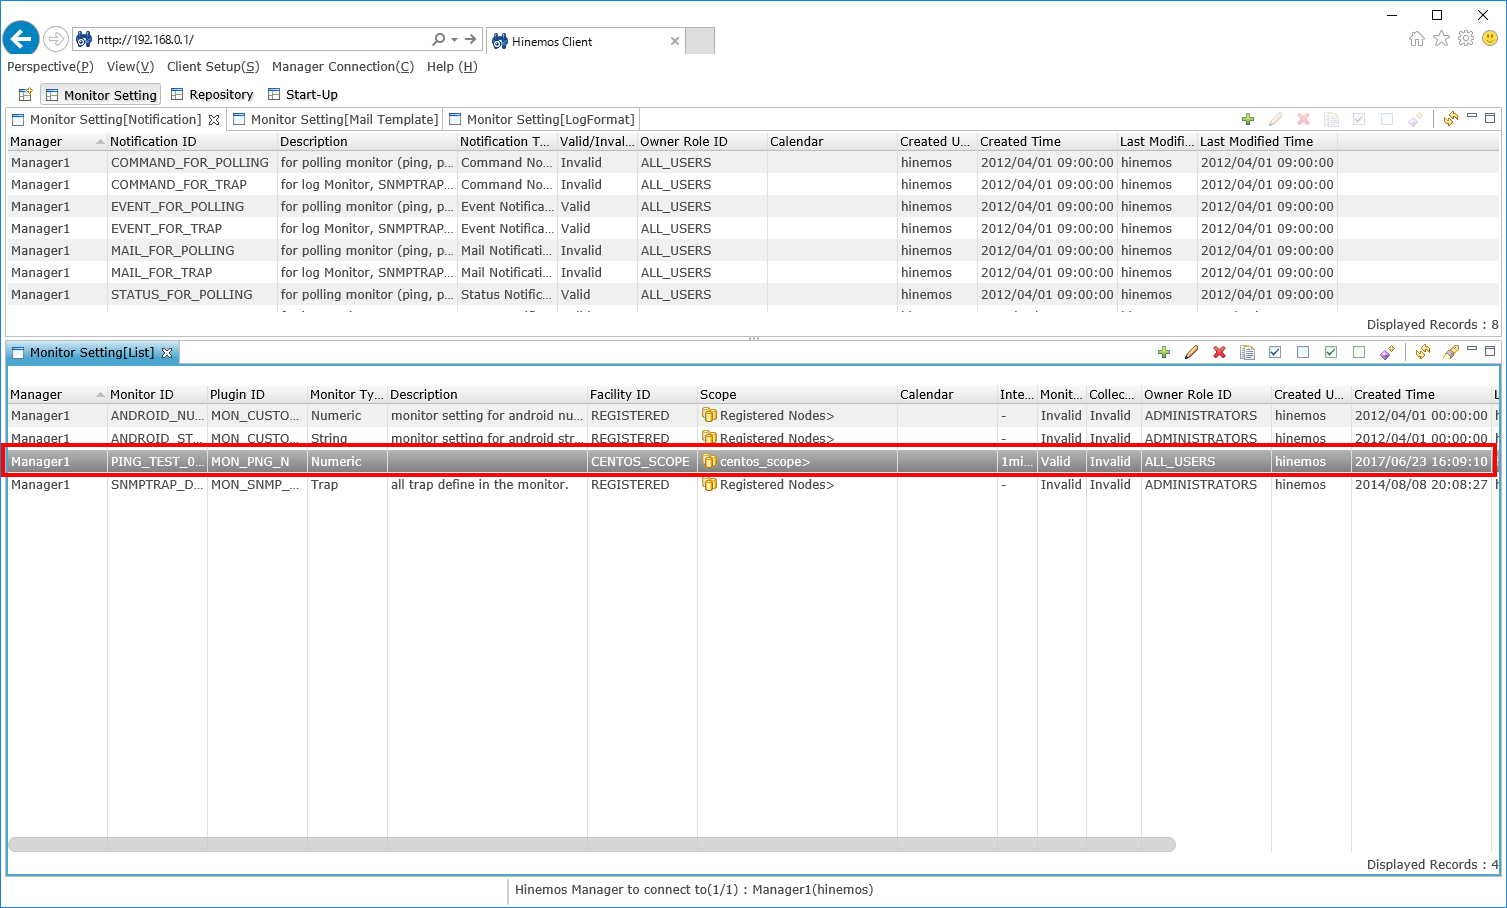
This finishes the configuration of PING monitor.
2. How to check the monitoring results
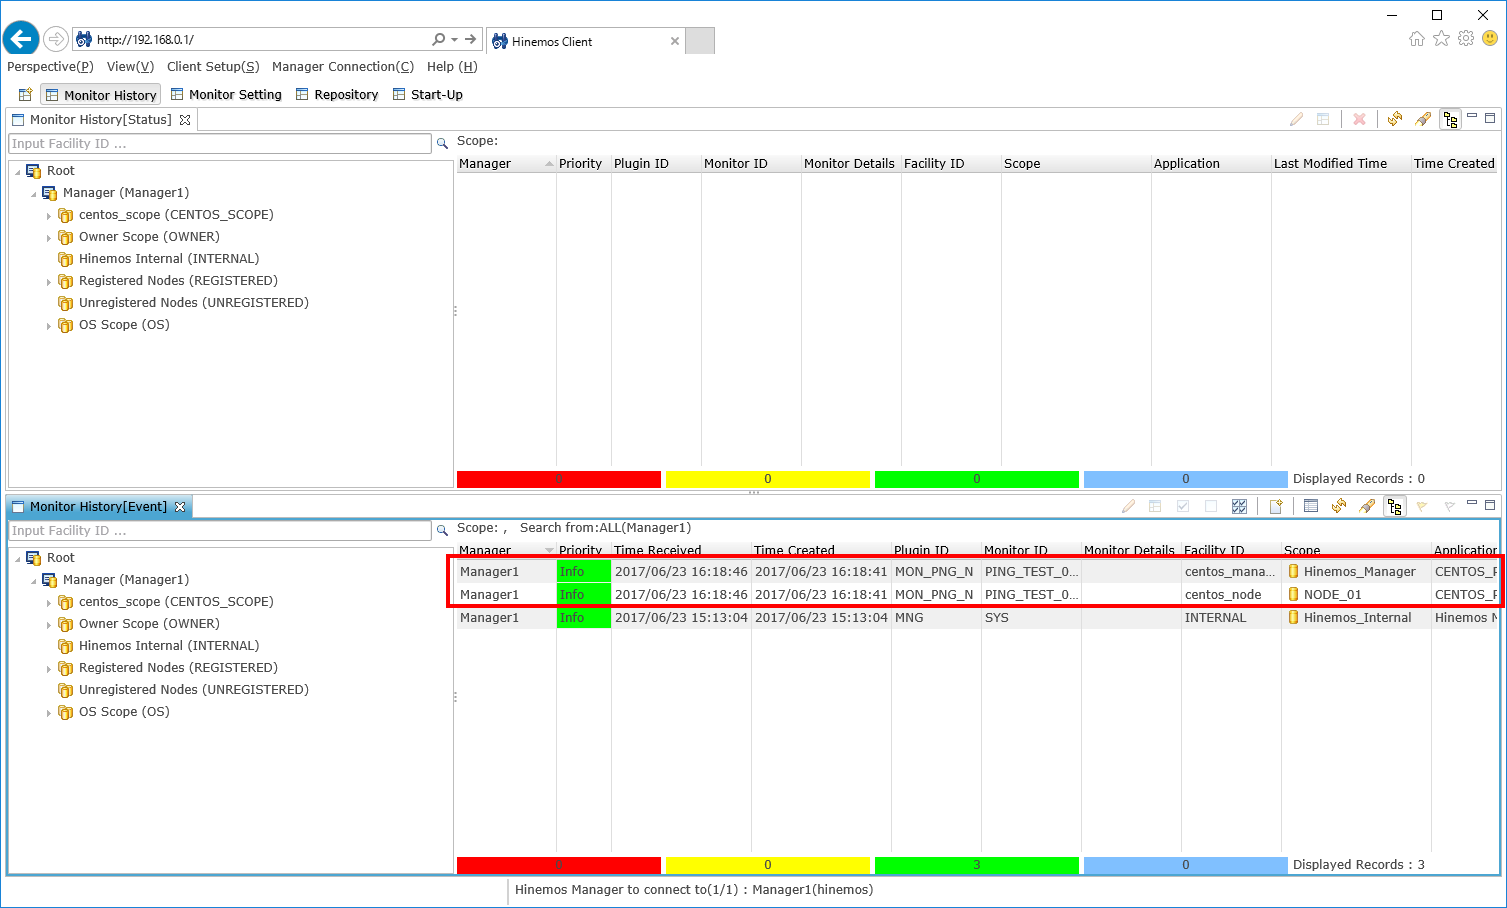
Let’s check the result of the PING monitoring you have just configured. Open the "Monitoring History" perspective from the menu bar.
↓Click to enlarge↓
If there are any ping responses from the monitoring target, monitoring results will be output in green (priority: information). The number of monitoring results is equivalent to the number of managed nodes (this time two).
↓Click to enlarge↓
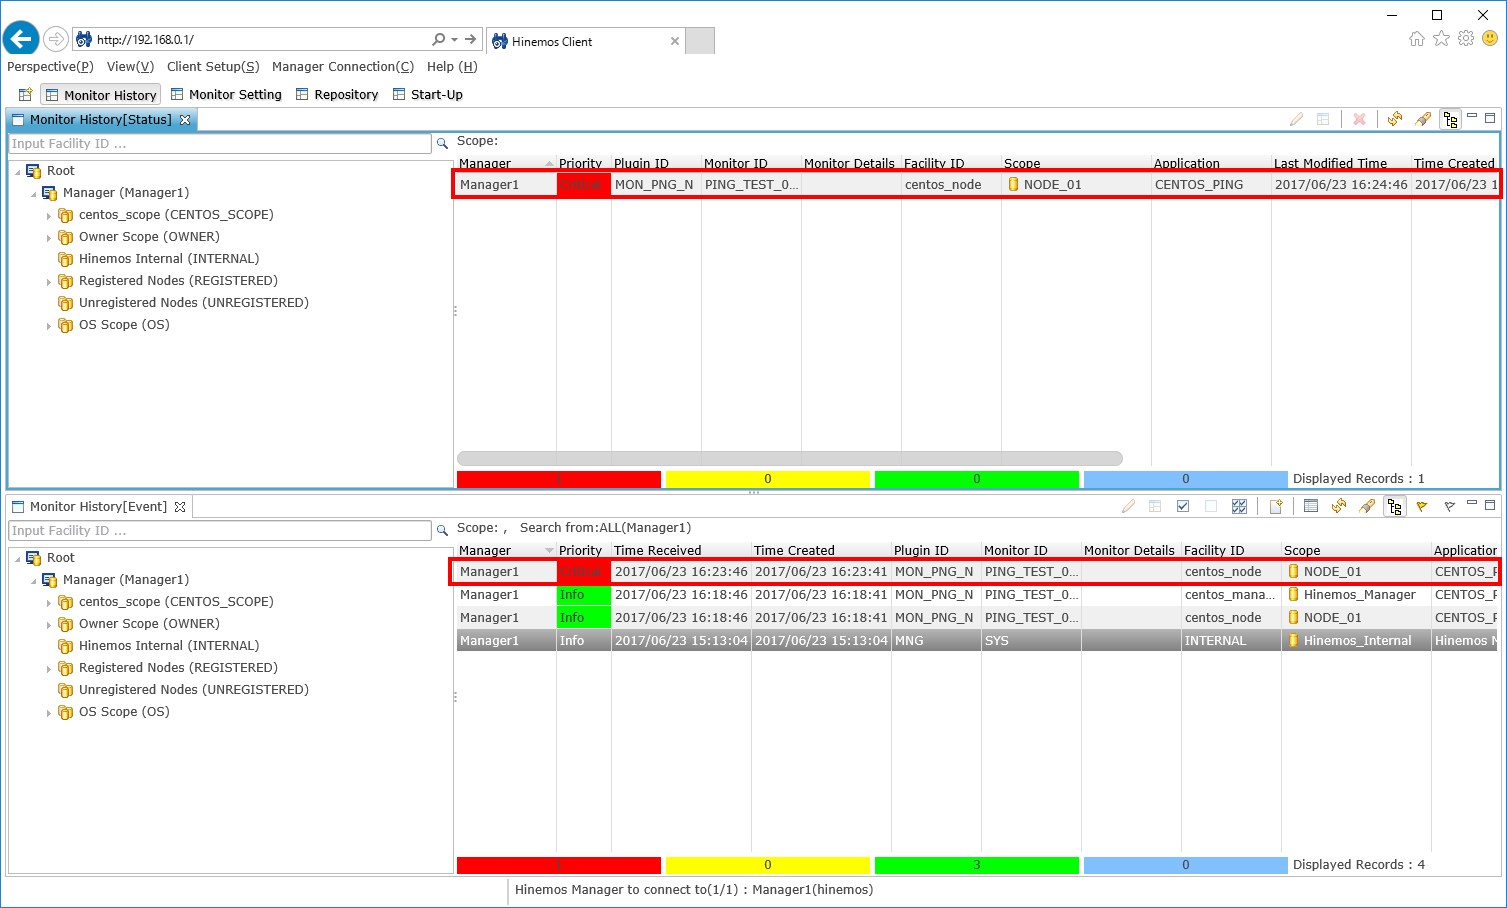
If you stop centos_node so it will not return the response to the ping, the monitoring result, for of the number of the managed target which failed to respond (this time one), is outputted in red (priority: critical) like shown below.
↓Click to enlarge↓
Summary
"Getting Started with Hinemos" with its concept, Introduction (1) introduced you how to install Hinemos Manager and Client, how to register monitoring targets, and how to setup simple monitor settings and monitoring results. Besides the PING monitoring we introduced in this tutorial, Hinemos can monitor the status of the monitoring target in many other ways. In Introduction (2), we plan to introduce you to the other monitoring methods.
